
Surgical Pathology
Enabling digital intraoperative pathology consultations

CEO at PreciPoint

CSO at PreciPoint
Overview
What is surgical pathology?
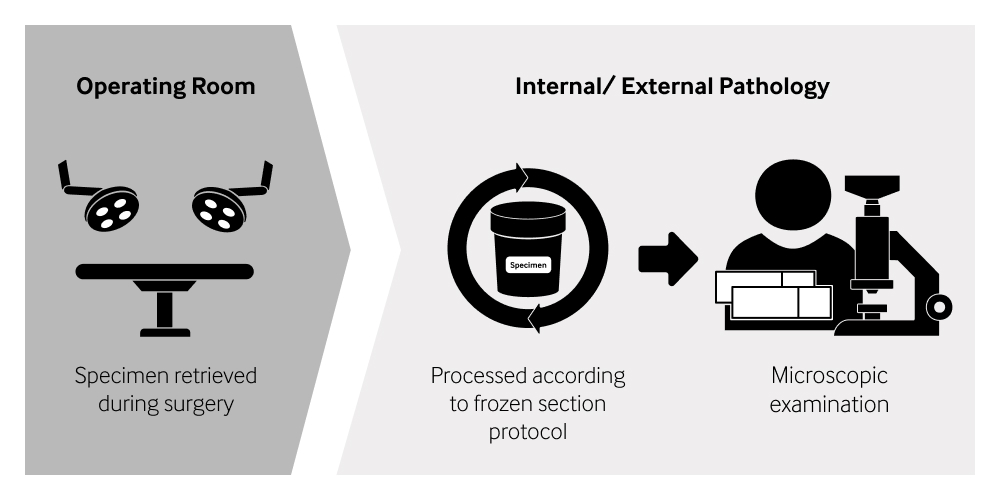
Surgical pathology is an area of practice in anatomical pathology. It consists of the evaluation by a pathologist of a surgical specimen – a tissue or fluid sample removed from the human body during a surgical operation. This assessment involves the gross inspection of the specimen and the microscopic examination of the fluid sample or of a tissue section prepared from the specimen. This process is called an intraoperative pathology consultation.
The rapid assessment takes place during surgery to provide the surgeon with the information he needs to take the necessary surgical steps. For example, a first benign vs. malignant evaluation, or the evaluation of the resection margins in case of a resection.
An accurate diagnosis is done after surgery using permanent FFPE slides. Depending on the clinical question, the final report can take up to a few days.
What are the different types of surgical specimens?
Tissue biopsies
| Type of biopsy | Surgical methods | Biopsied sites |
|---|---|---|
|
Endoscopic biopsies |
Endoscopic biopsies |
Hollow organs e.g. nose, sinus, digestive tract, bronchi |
|
Incisional biopsies |
Minimally invasive biopsies |
e.g. thoracic, abdominal and pelvic organs |
|
Core biopsies (needle biopsies) |
Core needle biopsies |
Solid organs e.g. bone marrow, breast |
|
|
Fine needle biopsies, also called: fine needle aspiration (FNA) |
e.g. bone marrow, thyroid, breast, neurological samples (cerebrospinal fluid) |
|
Excisional biopsies |
|
Any organ |
Surgical resections
Surgical resection is a surgical method whereby as much tumor tissue as necessary and possible is removed. The Mohs surgery is a modern resection method used primarily in skin cancer surgical procedures.
Unlike biopsies, which are done for evaluation purposes, resections are indicated when a malignant tumor has already been detected.
Common surgical methods for cytology specimen removal
Here is an overview of the most common types of surgical methods used to remove cytology specimens. This table intends to help the general understanding and does not claim to be exhaustive.
| Methods | Sites |
|---|---|
|
Fine needle aspiration (FNA) |
Bone marrow, any tumor |
|
Test of body fluids |
Body cavities |
|
Scrape of brush cytology (example: pap smear) |
Cervix, esophagus, stomach, bronchi and mouth |
Surgical pathology glossary of terms
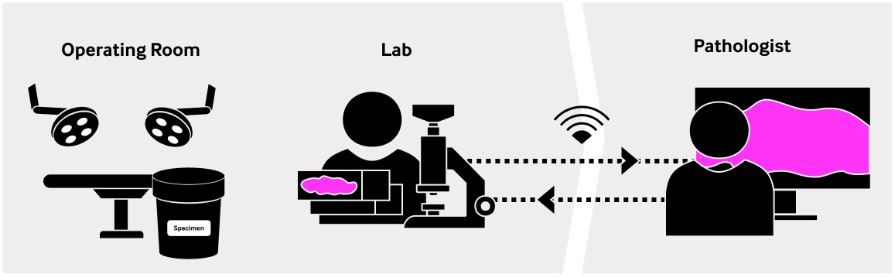
What is an intraoperative pathology consultation?
An intraoperative pathology consultation, or intraoperative procedure, is a quality assurance service provided by a pathologist during a surgery. It consists in the rapid evaluation of a surgical specimen (tissue biopsy, surgical resection, or cytology specimen).
It is sometimes also referred to as rapid on-site evaluation (ROSE), although technically speaking ROSE refers to the live evaluation of FNA smears and small specimens by a pathologist to guide the surgeon in real-time during a surgery.
Intraoperative consultations are mainly practiced in oncological surgery but are not limited to it.
The primary objective is to provide the operating surgeon with rapid pathological information according to which can be decided how the surgery proceeds.
Is the tumor cancerous or not (malign vs. benign evaluation)
For the removal of a biopsy, tell whether the right area has been targeted and evaluate the specimen adequacy.
For a resection, has the lesion or tumor been fully removed or does more tissue need to be taken out? In this case, the pathologist evaluates under the microscope whether the resection margins are clear of residual cancer or not.
The final objective of intraoperative consultations is to avoid follow-up surgeries and improve treatment outcomes for the patient. In terms of hospital care, intraoperative consultations contribute to improving surgery management and overall surgical patient management.
What is the difference between surgical and clinical pathology?
Overall intraoperative process time is critical
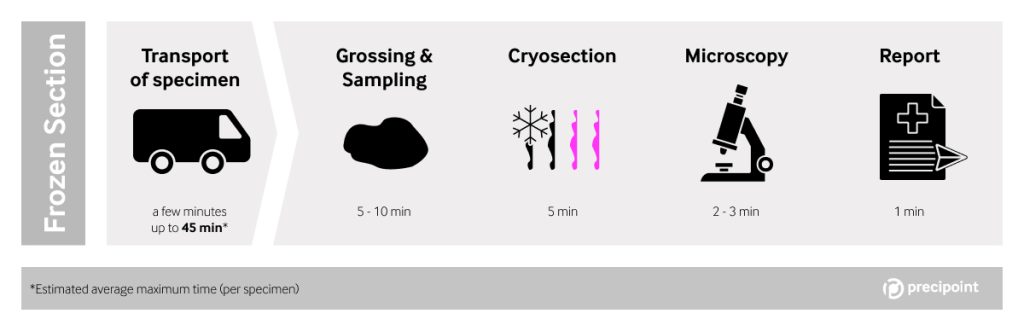
Swift intraoperative pathology workflows are very important. When the patient is lying on the operating table, every minute counts.Today, an intraoperative frozen section is usually performed within 20 minutes after the delivery of the specimen in the pathology lab. Reduced slide preparation time is possible because the frozen section protocol uses different, more rapid cutting and fixation techniques than in routine clinical histopathology.
Once the slide is under the microscope, the pathologist may provide his feedback within minutes.However, some factors greatly influence the overall time it takes to perform an intraoperative consultation such as a frozen section.In many countries, the lack of pathologists or the uneven regional distribution of pathologists within a country are significant constraints and may even challenge the feasibility of a consultation. For example, intraoperative procedures may not systematically be carried out, or are not carried out at all for non-critical surgeries, which may increase the chance of follow-up surgery.Additionally, when the operating room and the pathology lab are geographically distributed, or when the hospital does not have a full-time pathologist, the specimens have to be transported to a pathology lab or the pathologist needs to travel to the hospital. Not only does it represent a logistic challenge, but it also lengthens the overall time to examination and increases the costs of consultations.
Permanent vs. frozen sections
Due to the time sensitivity during surgeries, the protocol used to prepare frozen sections is different to the FFPE protocol used for permanent sections in routine pathology.
The frozen section method mostly involves manual tasks which must be performed very accurately under high time pressure. Therefore, frozen sections are usually prepared by trained and experienced technical medical assistants or technicians. For comparison, the main steps of each protocol are shown the following graphic.
Cryosection
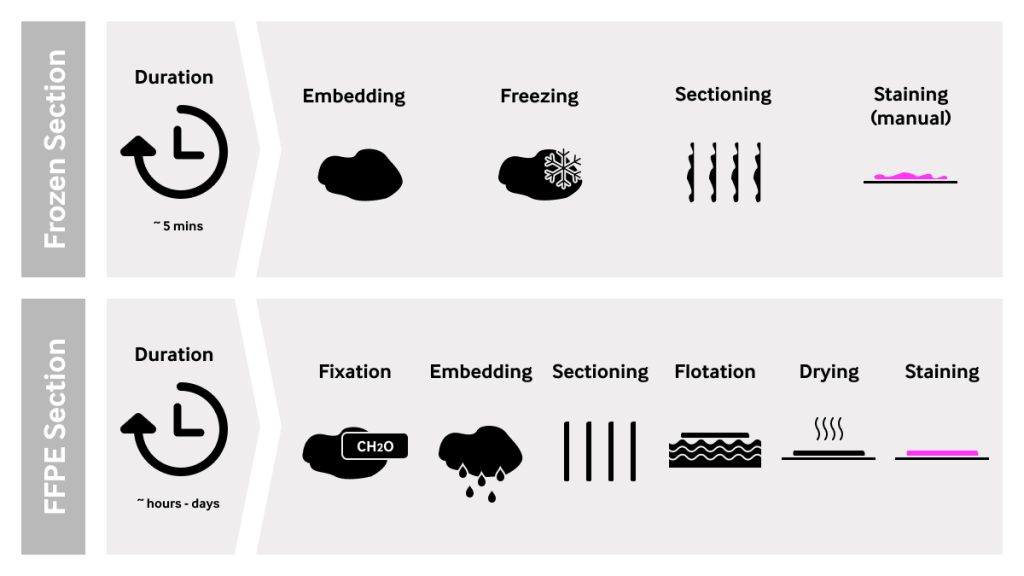
The technical name for a frozen section is cryosection. During a frozen section workflow, the cryosection process follows the macroscopic evaluation and sampling of the specimen.
Here are the most important steps of the cryosection:
Step 1: The tissue sample is placed in a special container and embedded with a gel or embedding agent (OCT).
Step 2: The tissue block is quickly frozen and placed in a cryostat. This step hardens the tissue block and makes it suitable for sectioning.
Step 3: The frozen block is sliced with a microtome into very thin sections.
Step 4: The sections are placed onto glass slides and manually stained.
The techniques used to prepare a frozen section allow for sample preparation within minutes. However, frozen section microscopy slides are of lower quality than permanent slides.
Why are frozen section slides of lower quality than permanent slides?
Usually, frozen section slides are not as plane as permanent slides and contain more artifacts.
Sections obtained from cutting frozen blocks are not as smooth and plane as sections obtained from FFPE blocks. In addition, when freezing, the water contained in the tissue can disturb the morphology of the cells. This is due to the so-called ice crystal artifact. Other artifacts such as overlapping tissue, dirt, or air inclusions can be introduced when manually cutting the frozen tissue, placing it onto the glass slide and staining.
Under the microscope, frozen sections are more challenging to assess than regular FFPE slides. They usually require experienced pathologists in the respective specialty.
Frozen section microscopy is also limited in scope and accuracy to the rapid delivery of information for surgery guidance. Frozen section slides are not adequate for a specific final diagnosis, nor can they be archived or stored longer term.
Can a frozen section slide be digitized?
Why are frozen section slides not plane?
In microscopic terms, frozen section slides can be very ‘bumpy’ compared to permanent slides prepared according to the FFPE protocol.
Unlike permanent slides, tissue blocks for frozen sections are not fixated, quickly embedded and shock frosted. The sections obtained from cutting such blocks are not as smooth and plane as permanent sections.
Frozen sections are also vulnerable to freezing artifacts and other artifacts resulting from manual preparation, making them even more inconsistent.
Even though it is possible to digitize ‘bumpy’ slides, the process of digitization / digital image generation takes significantly longer than routine pathology slide.
Why does it take longer to scan a ‘bumpy’ slide?
Let’s look at how a whole slide image (WSI) is created. The scanner sets an automatic focus point. The camera travels along the horizontal focus plane through hundreds of x-y positions, taking a picture at each position. All the pictures are then put together (stitching) to create one single image or whole slide image. For a regular permanent slide, this process usually takes a couple of minutes.
When scanning difficult slides such as a bone marrow smear or a frozen section, a different scanning process is used to generate a high-resolution digital representation of the tissue section: Not only does the camera travel horizontally through hundreds of x-y positions, but it also moves vertically, taking a picture at various z-axis positions for each x-y position. The sharpest picture at each z position is first identified and then used for stitching. This process takes much longer than for regular scans. In the case of a frozen section consultation, it must be repeated for each frozen section slide during the consultation (in average about 4 slides per consultation).
What takes just a few minutes for permanent slides often takes 5 to 10 minutes on average for a frozen section slide. As the overall frozen section workflow, including cryosection and microscopic assessment should not take longer than 15 to 20 minutes (depending on protocols), scanning a single frozen section slide will consume a large portion of the time available for the whole process.
Why are WSIs generated from frozen section slides often of lower quality?
Lower quality WSI are caused by the various artifacts commonly found in frozen section slides, such as ice crystal artifacts, cutting artifacts, overlapping, dirt, or air inclusions.
These artifacts cause certain areas of the WSI generated from frozen sections, or sometimes the entire slide, to be less sharp. This makes a microscopic assessment more challenging or impossible.
Why digitize intraoperative procedures?
1. Reduce Care Gap
The lack of pathologists is a global problem with extreme regional disparities. Patients from remote or developing parts of the world are often less likely to benefit from intraoperative procedures. The situation can be severe in densely populated, developing countries. According to our interview with Dr. Rabia Ali, Consultant Pathologist in Karachi, surgeries are done daily throughout Pakistan, but only very few pathology centers in the large cities offer intraoperative services.
Digital frozen sections can connect surgery departments to pathology centers across any distance and regional borders, potentially improving the feasibility of many procedures from a logistical and financial standpoint.
2. Improve patient care
The patient benefits of rapid microscopic assessment during intraoperative procedures are well researched: Studies show that in breast cancer reoperating rates were reduced by 70% from 48.9% to 14.9% using frozen sections1 and in prostate cancer 22% of cases found positive margins during frozen section, of which 92,3% of positive margins could be removed2. Therewith, significantly lower probabilities for reoperation are possible, which is a huge benefit to patients.
By connecting the specialists around a patient’s case during surgery, digital frozen sections can make intraoperative pathology services more readily available. As a result, more cancer patients could have access to the intraoperative procedure and benefit from improved surgical care and more individualized treatment plans.
*American Journal of Clincal Pathology Author manuscript; available in PMC 2014 Apr 16. Intraoperative frozen section analysis of margins in breast conserving surgery significantly decreases reoperative rates: one year experience at an ambulatory surgical centerJulie M. Jorns, M.D., Daniel Visscher, M.D., Michael Sabel, M.D., Tara Breslin, M.D., M.S., Patrick Healy, M.S., Stephanie Daignaut, M.S., Jeffrey L. Myers, M.D., and Angela Wu, M.D.
**Source: Journal of Urology 2013 Aug;190(2):515-20.doi: 10.1016/j.juro.2013.02.011. Epub 2013 Feb 13., Intraoperative frozen section of the prostate decreases positive margin rate while ensuring nerve sparing procedure during radical prostatectomyChristian von Bodman 1 , Marko Brock, Florian Roghmann, Anne Byers, Björn Löppenberg, Katharina Braun, Jobst Pastor, Florian Sommerer, Joachim Noldus, Rein Jüri Palisaar https://www.auajournals.org/doi/10.1016/j.juro.2013.02.011
3. Cut Total Procedure Time
4. Enable Second Opinion
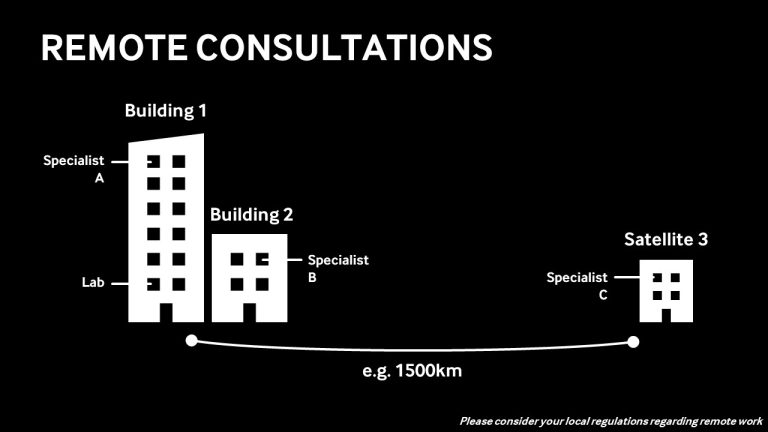
Frozen section interpretations necessitate knowledge and expertise in the relevant specialty or sub-specialty. When the expert is not locally available, it is virtually impossible to organize the second opinion of a qualified remote specialist within the consultation time. Digital frozen sections can enable access to a remote second opinion from a much wider pool of specialists as an immediate support to the on-site pathologist.
5. Cut Procedure Costs
Getting a surgical specimen into the hands of a pathologist involves traveling or transport, which inevitably drives up the overall procedure costs. High procedure costs have direct consequences on the accessibility to intraoperative pathology services.
From the point of view of a pathologist, and especially of a lab owner, intraoperative work is often a loss-making business line due to the time spent traveling and away from actual clinical work. Yet, intraoperative consultations need to be offered as a service to customers, so as to secure the far bigger volume of work stemming from routine pathology consultations. Offering intraoperative consultations can therefore be an opportunity for lab owners to increase their customer base.
Digital frozen sections can eliminate the travel costs related to a frozen section consultation. Pathologists can deliver their services more efficiently, driving up the number of cases they can see in the same amount of time.
Image generation technologies
Basically, there are two mainstream technologies available to generate a digital representation of specimens. Whole slide imaging (WSI) and digital microscopy.
WSI is designed for use in digital pathology where permanent digital image files are produced and made available for virtual microscopy, independent of time and place.
Digital microscopy’s primary target is to allow users to work live on their physical specimens from a computer. When digital microscopy is practiced remotely, one talks about telemicroscopy. Telepathology, which is the “practice of pathology from a distance”, technically relies on telemicroscopy technology solutions.
1. Whole-Slide Imaging (WSI)
Digital pathology is based on whole-slide imaging technology, also called slide scanning. WSI is the generation of permanent digital images using scanning devices (or short “scanner”) for review by a specialist, independently of time and place.
Unlike analog and digital microscopy, whole-slide imaging takes place in two separate, sequential process steps: the imaging and the viewing processes.
1) Imaging: Creation of the virtual image by a scanning device. The user feeds the glass slide into the scanner, sets parameters, and starts the scanning process. During the scanning process, the user must wait for the scanning process to be completed. After few minutes (or more, depending on the parameter settings, the general performance of the scanning device as well as the specimen and sample preparation) a digital representation, a so-called Whole Slide Image or WSI, is created and stored as a permanent data file. Those data files need significant storage space: one single WSI commonly requires 500-2000 mb in storage capacity.
2) Viewing: Visualization of the digital image by a specialist through a dedicated viewer software. The user can virtually assess the digital representation independently of time and place. Like Google Maps, the user can navigate through the image, zoom in and out and, if offered by the viewer software, further process the image. To display WSI data files, specific and often proprietary viewer software is required. Due to the complex image architecture of WSIs, special data file formats have been developed and established by various vendors. An additional disadvantage of WSIs is that the user no longer has live access to the actual specimen. This may be required when the scanning process produces images with areas out of focus, usually resulting in blurry pictures. Now, a time-consuming reworking process needs to be started causing inefficiency in the process.
Whole-slide imaging makes it possible to review a specimen independently of time and place. In certain use cases, this adds a lot of flexibility. However, the sequential process steps discussed above add time to the microscopy workflow, which is not always available in other use cases. During intraoperative procedures for example, when only few minutes are available for the whole procedure, the time required for sequential scanning of all slides of a case is prohibitive.
Presently, scanning solutions for digital pathology are most commonly found in research and education, as the availability of virtual images significantly facilitates collaboration. High-throughput scanners are mainly found in biobanking for research purposes. Pioneers in digital pathology have also started integrating scanners in clinical pathology workflows to deal with very high volumes of slides.
We asked the experts: Why are whole side images (WSI) so big?
Whole slides images are made of hundreds or thousands of high-resolution pictures that are stitched together to form one image and one single data file. You can think of them as a mosaic or image pyramid. A similar image generation process is found in Google Maps technology.
How large do these files get? A simple question to which there is no simple answer. The file size depends on a few parameters, including:
Type of sample
Size of scan area
Objective power
Here are some examples.
Sample type
View slide
File size
Digital Microscopy
Digital microscopy’s primary target is to allow users to visualize their specimens on a computer screen.
The main difference between digital microscopy and analog microscopy is that the image is captured by a digital camera and displayed instantly and live on a screen, rather than by the eye of the person looking through the oculars of the microscope. As such, digital microscopy is the evolution of the analog microscopy.
Digital microscopes are very similar in function to the analog microscopes in that they enable the immediate hands-on microscopic examination of a physical glass slide on a screen. Two main types of digital microscopes need to be differentiated:
Basic digital microscopes are, in essence, analog microscopes with a camera mounted on top. They display on a screen a microscopic image captured by the camera. Key differences exist in the optical nature of those products: The optical quality of the camera and the design of the whole optical pathway, that may or may not be built to deliver best image quality in a digital setting.
Digital live microscopes, often called robotic microscopes. They are fully motorized digital microscopes that do not require the intervention of an operator physically on the microscope. Once the glass slide is placed under the microscope, the user can fully control the microscope from the distance on a computer, whether that computer is next to the microscope or, say, 500 km away.
How to enable remote microscopy?
When used remotely, there are significant differences between a basic digital microscope and a robotic digital microscope. While basic digital microscopes require an on-site user to manually steer the microscope to be able to navigate through different x, y and z positions of the specimen, robotic microscopes come with a motorized x-y-stage and z-axis that allow the user to take full and active control of the motorized microscope from afar.
For long-distance remote usage, while a regular streaming software can be used to enable the remote access, it is highly recommended to use streaming software that is specifically designed for streaming highest image quality. Where common software will focus on holding the connection while quickly reducing video stream and image quality, other software is programmed to allow for the best available image quality to be streamed. It is strongly recommended for microscopy users to use streaming software applications that prioritize image quality over other streaming parameters.
Keep in mind that for remote evaluation, a good enough Internet connection must be available. In line with the tremendous progress seen in availability and speed of Internet connections, digital microscopy involving remote users is technically no problem. Yet, it may be challenging for local infrastructure and IT teams when the circumstances don´t allow for remote usage.
Telemicroscopy for digital frozen sections
Telemicroscopy refers to the ability to access a digital microscopy image from a distance. The devices used for telemicroscopy are called digital microscopes, whereby this term encompasses a large variety of products (see chapter Image generation technologies).
The most advanced category of digital microscopes are the digital live microscopes, also known as robotic microscopes. In the following paragraphs, we are using the term robotic microscopes.
What is a robotic microscope?
A robotic microscope is a fully motorized digital microscope that can be fully controlled through a control software on a computer and does not require the physical intervention of the operator on the microscope. Once the glass slide is placed under the microscope, the user can fully control the microscope from the distance via the computer, whether that computer is next to the microscope or, say, 500 km away.
This is one of the many reasons why a robotic microscope offers significant advantages for rapid microscopic assessments such as frozen sections. Further reasons are discussed above (see 6. Can a frozen section slide be digitized?)
7 interesting facts about robotic microscopes
Robotic microscopes:
Allow for live observation of physical specimen
put the user in charge of the imaging process
offer the same hands-on user experience as analog microscopes
have a near-instant time-to-view
do not necessarily need integration to a LIS or LIMS
do not require any image file management or transfer prior to viewing
do not require any storage infrastructure for large WSI files
Technical requirements
Installation
At the user site, the robotic microscope is ideally located where the sample preparation equipment is set up. The robotic microscope, consisting of a microscopy hardware device (the microscope) and a computer hosting the control software usually comes preconfigured and require few installation activities. More often than not, the IT department will integrate the host computer to the internal IT network. The solution is now ready for use.
To enable remote usage, a dedicated streaming software is required and can be set up by the IT department. It is recommended to use a streaming service that is tailored to the needs of microscopy, whereby delivering the highest available image quality has priority over other streaming parameters. As the host computer is part of the internal network, that computer can be accessed from other computers within the network, for example from a partner institute.
When the computer and the streaming software are set up, the robotic microscope can now be fully controlled remotely and allows to steer both the x-y stage for navigation through the slide and the z-axis for refocusing.
Monitor
When it comes to the quality of the displayed image, the monitor displaying the image plays a big part. To display high-quality images, a resolution of 3840×2160 (4K) is recommended. For remote consultations, the same is recommended on both sides, for sender and receiver.
Computer
The host computer must be capable of processing the digital microscopic images generated, processed, and visualized by the control software. Therefore, the computer should be equipped with sufficient internal memory, a powerful processor, and a decent graphics card.
For telemicroscopy applications, good performance of the sending computer (host computer) is important. Prior to image transmission, the images are compressed by the streaming software. They are packaged to enhance their transferability, which is only possible with a high-performing host computer. The receiving computer does not need to be able to perform as much, because unpacking the images via the streaming software does not require very intensive computing.
Internet connection
For remote usage, a stable Internet connection must be available at both the microscope (sending) and the end user (receiving) sides.
The Internet line should be able to actively process at least 50 Mbit/s upstream and downstream. This means that the Internet line is capable of continuously transmitting a data volume of 50 Mbit/s in both directions throughout the duration of the stream.
To be able to work without any delays, a transmission rate between 30 and 60 frames per second, also called FPS, is ideal.
The abbreviation ‘Mbit/s’ indicates how much data can be transferred per second.


